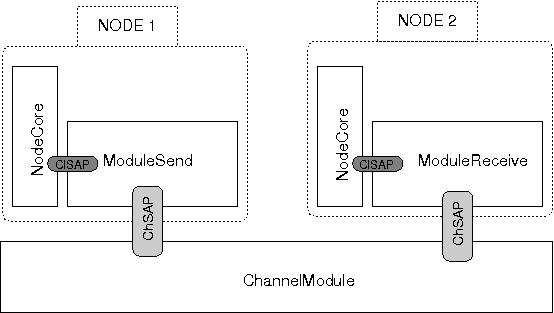
Architecture designed in sample 1
http://www.dei.unipd.it/wdyn/?IDsezione=3965.

Architecture designed in sample 1
Now we analize what is done in samnple 1.
First of all you have to load the libraries needed in this sample (i.e., Miracle, Trace and Sandbox library):
load <path of your Miracle library main folder>/.libs/libMiracle.so.0.0.0
load <path of your Trace library main folder>/.libs/libTrace.so.0.0.0
load <path of your Sandbox library main folder>/.libs/libMiracleSandbox.so.0.0.0
Then, it is declared the finish procedure in which are defined all the operations to be done at the end of the simulation (i.e., flushing the trace), in fact this procedure will be called at the end of the simulation as we will see in the sequel.
proc finish {} { global ns tf puts "---> SIMULATION DONE." $ns flush-trace close $tf }
Next step consists on the initialization of all the classes variables binded in TCL, in detail:
Module/SendModule set period_ 0.1
Module/SendModule set destPort_ 0
Module/SendModule set destAddr_ 0
ChannelTest set debug_ 0
Module/SendModule set debug_ 0
Module/ReceiveModule set debug_ 0
ConnectorTrace/ChSAP set debug_ 0
ConnectorTrace/Bin set debug_ 0
where period_ is the period between two consecutive packets transmissions of ModuleSend, destPort_ destAddr_ define, respectively, the TCP destination port and address to be specified in the TCP header of the packet and finally all the debug_ variables specifies the level of the video output tracing of detailed simulation activity usually used in the debug phase.
Then it is necessary to initialize the global instance of the simulator (ns and all the internal variables of the Miracle library (use-Miracle TCL command):
set ns [new Simulator]
$ns use-Miracle
Here we define the name of the output file of tracing and the we give its configuration:
set tf [open out_sample3.tr w]
$ns trace-all $tf
We have now to define the type of channel to use (ChannelTest is the one within the Sandbox library):
set channel [new ChannelTest]
Now we may begin the procedure to generate a node, the fisrt one is Node 1, the one that has the SendModule. Firts of all you have to initializate all the variables of the node and define the number of layer you are going to use (1 in this example):
set node1 [$ns create-M_Node 1]
then you have to instantiate a new module of the class ModuleSend
set sm [new Module/SendModule]
now you can place the module (referenced by $sm)in the stack thanks to the addModule TCL command, where you have also to define the layer in which you want to put the module (1) and the trace level of the ClSAP (0 in this sample). The command returns the position of the module (i) in its layer, used later on to define the connections:
set i [$node1 addModule 1 $sm 0]
Command addToChannel attaches the channel defined above ($channel) to the module(s) in layer 1 and set depth at level 2 in the ChSAP(s)
$node1 addToChannel $channel 1 $i 2
The node architecture is now defined, thanks setup-M_Node you can instantiate all the structures involved:
$ns setup-M_Node $node1
The same operations are repeated for node 2:
set node2 [$ns create-M_Node 1]
set i [$node2 addModule 1 [new Module/ReceiveModule] 0]
$node2 addToChannel $channel 1 $i 1
$ns setup-M_Node $node2
Now we define the steps to be done during simulation. First, start TCL SendModule command begins the generation of packets and their transmissions:
$ns at 0 "$sm start"
stop stops the packets generation at 50 secs:
$ns at 50 "$sm stop"
At 51 secs it is scheduled to run the finish procedure and the simulation is stopped ( halt command):
$ns at 51 "finish; $ns halt"
Finally, run the simulation:
$ns run
Try this sample by typing ns sample1.tcl in command line.
For a detail description of the classes used in Sandbox library see the comments inline. Regarding the format of the trace in output see the documentation of the \link Trace \endlink class.
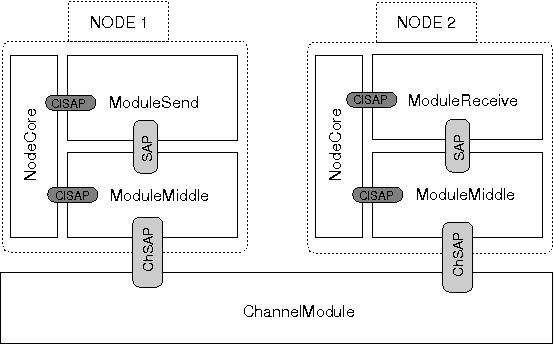
format method). In order to use your cross layer message in the simulation you have to invoke the addClMessege of the ClMessage class, then it returns the unique identifier during the simulation of the cross layer message. Then, if you had defined a specific tracer for it, you have to load it in the cross layer tracer instance of the simulation, yuo can do this thanks to the addTracer method of the ClTracer class. In this sample all these operations are done during the initialization phase of the Sandbox library (i.e., in the Miraclesandbox_Init method defined in the module-send.cc file). Next figure gives the scheme of the architecture implemented in this sample.

Architecture designed in sample 2
In this sample we consider two layers with one module per layer for both the nodes. At the top of each stack there are the SendModule and the ReceiveModule (the same described in sample 1), which are in charge to generate and receive packet respectively. At layer 1, there are in both stacks a module called ModuleMiddle, which has essentially to forward the packet received to the module(s) of the bottom layer. Now SendModule, each times it receives the TCL command changeiface, it has to change the interface selection at layer 1 operated by ModuleMiddle by means of the cross layer message called SANDBOXMSG.
In the following we analize what we have done in sample 2, we describe only the procedures introduced with this new scenario, so please refers to description of sample 1 to all the details omitted in this one.
load <path of your Miracle library main folder>/.libs/libMiracle.so.0.0.0
load <path of your Trace library main folder>/.libs/libTrace.so.0.0.0
load <path of your Sandbox library main folder>/.libs/libClTrace.so.0.0.0
load <path of your Sandbox library main folder>/.libs/libMiracleSandbox.so.0.0.0
proc finish {} {
global ns tf
puts "---> SIMULATION DONE."
$ns flush-trace
close $tf
}
Module/SendModule set period_ 0.1
Module/SendModule set destPort_ 0
Module/SendModule set destAddr_ 0
ChannelTest set debug_ 0
Module/SendModule set debug_ 0
Module/MiddleModule set debug_ 0
Module/ReceiveModule set debug_ 0
ConnectorTrace/ChSAP set debug_ 0
ConnectorTrace/Bin set debug_ 0
set ns [new Simulator]
$ns use-Miracle
set tf [open out_sample3.tr w]
$ns trace-all $tf
set channel [new ChannelTest]
set node1 [$ns create-M_Node 2]
set sm [new Module/SendModule]
set mm [new Module/MiddleModule]
set i [$node1 addModule 2 $sm 3]
set j [$node1 addModule 1 $mm 3]
$node1 setConnection 2 $i $j 1
$node1 addToChannel $channel 1 $j 1
$ns setup-M_Node $node1
set node2 [$ns create-M_Node 2]
set i [$node2 addModule 2 [new Module/ReceiveModule] 0]
set j [$node2 addModule 1 [new Module/MiddleModule] 0]
$node2 setConnection 2 $i $j 1
$node2 addToChannel $channel 1 $j 1
$ns setup-M_Node $node2
puts "Node 2 is generated."
puts "---> BEGIN SIMULATION"
$ns at 0 "$sm start"
$ns at 5 "$sm changeiface 1 [expr rand()]"
$ns at 10 "$sm changeiface 2 [expr rand()]"
$ns at 20 "$sm changeiface 3 [expr rand()]"
$ns at 30 "$sm changeiface 4 [expr rand()]"
$ns at 40 "$sm changeiface 5 [expr rand()]"
$ns at 50 "$sm stop"
$ns at 51 "finish; $ns halt"
$ns run
Command setConnection adds a SAP below level 2 between module refereced by $i and $j, where $i has to be the one in the above layer (2 in this case) and sets the depth of tracing to level 1. In the scheduled actions, note that changeiface TCL command of the ModuleSend class is the trigger that tells to the module to send the cross layer message (SANDBOXMSG) to each ModuleMiddle placed in layer 1 after a random time.
Please refers to commnents inline in the source files for further explanations.
SandboxPlugIn1 has to discover all the ModuleSend instances presented in the whole node stack. This is a two phases process: SandboxPlugIn1 has to broadcast a cross layer message in order to reach any ModuleSend present in the stack thanks to the SANDBOXPLG1MSG ClMessage. ModuleSend answers to the source of this message, so SandboxPlugIn1 will have in the source field of the message received the id of the ModuleSend. ModuleSend, SandboxPlugIn1 sends another cross layer message, SANDBOXPLG1MSGS, in which it requires to ModuleSend to change the size of the packets generated with the value indicated in the SANDBOXPLG1MSGS. The structure obtained is shown in the following figure.

Architecture designed in sample 4
In the following we propose the simulation script of this sample.
load <path of your Miracle library main folder>/.libs/libMiracle.so.0.0.0
load <path of your Trace library main folder>/.libs/libTrace.so.0.0.0
load <path of your Sandbox library main folder>/.libs/libClTrace.so.0.0.0
load <path of your Sandbox library main folder>/.libs/libMiracleSandbox.so.0.0.0
proc finish {} {
global ns tf
puts "---> SIMULATION DONE."
$ns flush-trace
close $tf
}
Module/SendModule set period_ 0.1
Module/SendModule set destPort_ 0
Module/SendModule set destAddr_ 0
ChannelTest set debug_ 0
Module/SendModule set debug_ 10
Module/MiddleModule set debug_ 0
Module/ReceiveModule set debug_ 0
SandboxPlugIn1 set debug_ 10
ConnectorTrace/ChSAP set debug_ 0
ConnectorTrace/Bin set debug_ 0
set ns [new Simulator]
$ns use-Miracle
set tf [open out_sample4.tr w]
$ns trace-all $tf
set channel [new ChannelTest]
set node1 [$ns create-M_Node 2]
set sm [new Module/SendModule]
set mm [new Module/MiddleModule]
set plg1 [new SandboxPlugIn1]
set i [$node1 addModule 2 $sm 3]
set j [$node1 addModule 1 $mm 3]
set p1 [$node1 addPlugin $plg1 3]
$node1 setConnection 2 $i $j 1
$node1 addToChannel $channel 1 $j 1
$ns setup-M_Node $node1
puts "Node 1 is generated."
set node2 [$ns create-M_Node 2]
set i [$node2 addModule 2 [new Module/ReceiveModule] 0]
set j [$node2 addModule 1 [new Module/MiddleModule] 0]
$node2 setConnection 2 $i $j 1
$node2 addToChannel $channel 1 $j 1
$ns setup-M_Node $node2
puts "Node 2 is generated."
puts "---> BEGIN SIMULATION"
$ns at 0 "$sm start"
$ns at 1 "$plg1 discover"
$ns at 20 "$sm stop"
$ns at 21 "finish; $ns halt"
$ns run
Thanks to the addPlugin TCL command, we add the SandboxPlugIn1 PlugIn to the structure instantiated before (variable p1), also we set to 3 the depth value of tracing of the ChSAP that will connect the PlugiIn to the NodeCore. After 1 second of simulation, with the TCL command discover, SandboxPlugIn1 starts the procedure of discovery decribed above and sets the new value of packet size. Please refers to commnents inline in the source files for further explanations.
 1.5.2
1.5.2